It's my month for the SewBeeIt group and I've selected to use batik fabrics to make a block referred to as the "Garden Fence." Not sure why it's called that but I like the appeal of using scraps and strip piecing. I've seen pictures on flickr that show the center square being one print, the corners being another print, and white solid for the block sashing. Of course, I want to be different.
Here are the cutting dimensions for one block that finishes at 10" (10 1/2" unfinished)
Center square: 4.5" x 4.5"
Outer corners: 4 - 2.5" x 3" and 4 - 2.5" x 5"
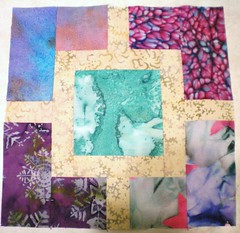
Jovanna's Batik Garden Fence Quilt Block
Here are the cutting dimensions for one block that finishes at 10" (10 1/2" unfinished)
Center square: 4.5" x 4.5"
Outer corners: 4 - 2.5" x 3" and 4 - 2.5" x 5"
Beige (light): 1.5" strips
This tutorial to to help my beemates to make 2 blocks for me. Please do not wash the fabric.
Each packet will have 2 types of beige-ish batik for the sashing that needs to be cut into 1.5" strips (far bottom right). You can mix and match like I did, or you can make them all match.
Next, identify the 2 batiks that are approximately 5" wide to cut the two 4.5" squares for the center (bottom left).
Finally, each person will have 8 different batik strips to cut into 2.5" strips, then cut one 3" and one 5" rectangles for the corners. I provided enough fabric in case you have a lapse in measuring, like my first block had 4" centers so now it's going to be a glorified potholder.
Sew a border of beige fabric around the 4.5" squares, sewing opposing sides on first, then the next opposing sides. Press to the outside.
Layout the corners to determine which fabric will be paired together. Sew the two top small rectangles together with a sashing in the middle to create a "spoke" from the center, and do the same for the bottom. These are sewn on the bordered center blocks. I prefer to sew the set to the "short" side first -- the side where the first beige border was sewn (see the example block).
Sew the matching longer rectangles to the beige sashing to create the last "spokes" from the center. Make sure the batik fabrics match in the corners (see example block).
Press the seams anyway you see fit as you work your way around the block.
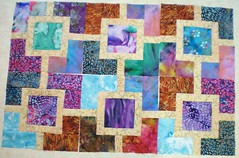
The end result will start to look like this:
The "spokes" will match up creating an interesting effect of plus signs and floating squares.
This tutorial to to help my beemates to make 2 blocks for me. Please do not wash the fabric.
 | |
| March Batik Packet |
 | |
| 8 batik strips for corners |
Finally, each person will have 8 different batik strips to cut into 2.5" strips, then cut one 3" and one 5" rectangles for the corners. I provided enough fabric in case you have a lapse in measuring, like my first block had 4" centers so now it's going to be a glorified potholder.
How-To Sew It All Together
 |
| Batik Garden Fence Block |
Layout the corners to determine which fabric will be paired together. Sew the two top small rectangles together with a sashing in the middle to create a "spoke" from the center, and do the same for the bottom. These are sewn on the bordered center blocks. I prefer to sew the set to the "short" side first -- the side where the first beige border was sewn (see the example block).
Sew the matching longer rectangles to the beige sashing to create the last "spokes" from the center. Make sure the batik fabrics match in the corners (see example block).
Press the seams anyway you see fit as you work your way around the block.
The end result will start to look like this:
 |
| Quilt layout without sashing |
No comments:
Post a Comment